A multimeter is also called a multitester or a VOM. It is a measuring instrument, or you can say that it’s an electronic measuring device used for different measurement functions, such as current, resistance, voltage, etc.
There are two types of multimeters in the market; digital multimeters and analog multimeters. All these come with distinguishing measurement functions.
Table of Contents
Benefits of the Multimeter
- Multimeters make your work easier, as they easily evaluate and interpret the values.
- They enable you to make the perfect connections by giving the perfect values
- This device comes with the function of automatic results display
- They reduce the chances of electricity and fire by almost up to 99%
- They contain the automatic polarity functions
- Multimeters enable you to get accurate results
Multimeter Features
A multimeter enables you to understand the internal system of your circuits; they show you the inside goings of your circuits. If something goes wrong inside your circuit, the multimeter will help you understand and solve that issue. For instance, if some wire gets broken and doesn’t pass the current properly, the multimeter will lead you to the issue.
There are so many varieties of multimeters in the market, they possess different functions, distinguished accuracy levels, and come for different purposes, plus they come in many price ranges.
Basic multimeters (with cheap rates) are usually used to measure the simple and most important current, resistance, and voltage values. You can choose the best suitable product according to your budget and need. But for its best usage, you need to understand a few points.
Display section: As the name suggests, this is where everything is shown; in this area, measurements, levels, and work are displayed. It’s like a screen, where results and reasons are shown.
Ports: The word ports are telling its purpose; it’s the area used for the probes. Here probes are plugged in to keep up the work.
Probes: These are plugged into the ports for work; usually, a multimeter contains two probes, red and black. These are different in color but contain almost the same functioning criteria. The Black probe is always attached to the port COM, and the red probe connection depends on the measuring area.
The uses of a multimeter are plenty and one of them includes the testing of a dead outlet. In addition, common household issues such as dead tripped circuit breakers, light switches, dim lights, and electric shocks can be investigated using a multimeter.
You can also use a digital multimeter for your automotive work. However, special care must be taken before experimenting with electricity. The simplest and safest way to test power outlets is to use the best multimeter.
In this article, you will learn how to use a digital multimeter for testing an outlet, and measuring voltage and resistance in detail.
How to Use a Multimeter to Test an Outlet

There are various uses of a multimeter; the answers to the following questions can be determined using it:
Is the power able to reach the outlet? Or is there a breakage somewhere between the lines?
Is the outlet dead due to improper grounding?
Playing with electricity can be as dangerous as the current in an active outlet lethal enough to cause bodily harm. Safety gloves should always be worn before testing whether the outlet is dead or not.
- Firstly, please turn on your multimeter, and under the alternating current (AC) setting, set it to measure voltage (V).
- It is always favorable to test the multimeter itself before testing the outlet. For this purpose, the multimeter should be used to test an active and working outlet to see whether it is giving correct results.
- All multimeters contain attached two probes: the red (positive) and the black (negative) one. Set the dial to measure AC voltage and Insert one probe into any vertical slot while the other into another.
- While measuring AC voltage, remember that it does not matter which probe is inserted into which slot as the current constantly alternates between the positive and the negative. The display screen showing the voltage from 110 to 120 volts means that your multimeter is in perfect working condition.
- Now. Put the probes into the outlet, which needs testing. If the screen shows a voltage between 110 and 120 volts, the outlet is working correctly. However, if a voltage of “zero” is displayed on the screen, it would mean that either the outlet is not connected to a proper circuit breaker or the connection between the circuit panel and outlet is loose/broken.
- To check if the outlet is grounded correctly, put the black probe in any vertical outlet slot and the red into the smaller earth penal.
- If the outlet is ideally grounded, the screen must display 110-120 volts on the screen. However, if it shows 0 voltage, either the ground wire is broken, or the outlet has improper wiring.
Test Outlet Voltage with Multimeter
Before connecting an electronic device to an outlet, first, you need to test the outlet. Bad wiring and poor grounding connection could cause severe damage to your sensitive electronic devices or make them exhibit very unpredictable behavior. Using the best multimeter and following the above-explained method, you can always test the voltage of your outlets and avoid any uncertainties.
Test Dryer Outlet with Multimeter
An electric dryer uses a relatively high voltage outlet as compared to other outlets. Therefore, the outlet’s voltage must be 220-volt provided that the voltage for the proper and safe operation of an electric dryer is adequate. The procedure to test such an outlet goes as follows:
Under the alternating current (AC) setting, set the multimeter to measure 220-240 volts. Now, insert the probes into the “hot slots” of the outlet and note the reading on the multimeter; it must be between 220 to 240 volts. For example, if you have a 3-slot outlet, the probes must be inserted into the two vertical slots side by side.
Test Wall Outlet with Multimeter
A faulty wall outlet could be a reason that your appliances aren’t working the way they used to. It is a good idea to test the wall outlet voltage in such a case.
Ensure that the wrong polarity on your wall outlets does not create a problem during tests; the multimeters have been incorporated with auto-polarity functions.
It also helps avoid parallax errors or different interpretation values if readings are taken from different angles. The steps explained above can quickly be followed to test a wall outlet.
How to Use a Multimeter to Test Voltage
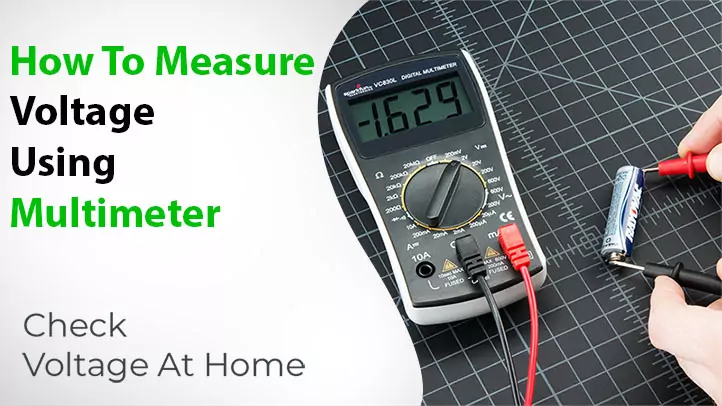
Following are the basic steps for measuring voltage using a multimeter;
- First of all, one must close the current supply to the circuit and make sure no current is passing because it’ll cause harm
- Attach the mode to V with a wavy or straight line (according to your need)
- Must confirm that the red probe is attached to the port, V next to it
- Attach the red probe (always) with the positive side of the component (where the current is coming from),
- Attach the COM probe with another side of the component, to the side needed according to the measuring tape
- Then read out the value (shown on the screen)
A multimeter is used to measure different aspects, as mentioned above, depending on its type of measurement. You can measure both AC and DC voltage through a multimeter. However, both are shown differently. VΩ with the wavy line shows AC voltage and the straight line shows DC voltage. Connect the multimeter in a ‘parallel’ direction for measuring voltage.
How to Use a Multimeter to Measure Resistance
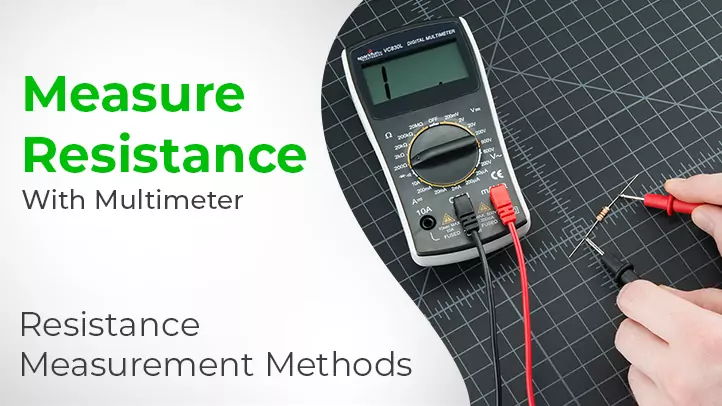 Once the power has been removed from a circuit, the common voltage and current measurements become of little importance. Instead, measuring the resistance becomes the only option left to determine the active components and conductors.
The best multimeter to use in such a case would be a digital multimeter which has recently outclassed the analog type multimeter. The accuracy, compactness, and ease of reading measurements are some of the prominent features of a digital multimeter.
It performs all the functions of AC and DC that an analog meter offers, with some of them offering an extra advantage of frequency and temperature measurements.
The first and most challenging step in measuring the resistance is selecting a range that can be tricky, especially if you are not sure about the range you need to fix. The range can vary from as low as 1ohm to as high as 1megaohm (one million).
Easy steps for Resistance Measurement:
The resistance of any circuit can be measured by following the steps below:
- Turn off the power of the circuit.
- In the COM jack, plug the black test lead, and in the negative input, jack place the red test lead.
- Hold the probe tips and connect them across the portion or component of the circuit for which the resistance is to be determined.
- Now you need to move the dial, start with the lowest ohmic value in the ohm region, then adjust the dial to a resistance bigger than that being measured for optimum sensitivity.
- The ranges vary from 200ohms to 2megaohms.
Measure Resistance in a Circuit
The flow of electricity in a circuit can be maintained using a multimeter. As we know that if the circuit is broken, the electricity stops circulating, and the lights, plugs, etc. stop functioning no matter what the reason is, it could be a loose connection or a damaged wire. When used correctly, a multimeter can help you diagnose and make repairs. The following steps should be followed to check a circuit.
Determine the type of voltage (AC or DC) you’re working with. Usually, the devices operated by your home electricity are AC while the devices powered directly by a battery (such as a car) are DC.
- Identify a suitable voltage and turn the selection switch to it.
- Locate the COM outlet on the multimeter and plug the black lead into it.
- Locate the jack marked with a V and connect it with the red lead.
- Turn your selector and adjust to the highest setting.
- Switch off the power or take out the battery of the device you’re working with.
- On one side of the circuit to be tested, touch the black and on the other side, touch the red lead.
Measure Resistance in a Parallel Circuit
Parallel circuits are used in places where there is a need to connect multiple electrical components to the same point. They are useful in that even if one component fails the others remain unaffected. The current in a parallel circuit is divided but the voltage is the same.
Christmas lights and household wiring systems are very good examples of such circuits. By using a multimeter, the resistance, and voltage of the components in a parallel circuit can be checked by following the steps below:
- Separately measure the resistance of each resistor.
- Turn the multimeter on and set the knob towards the Greek letter Omega to measure the resistance.
- Maintain a multimeter probe on each piece of resistor cable and record the results.
Measure Insulation Resistance
A multimeter is of extreme usefulness in measuring the insulation of wires, particularly high voltage ones. It is equally useful in measuring the insulation of a single cord and insulation between two cords. The process has been simplified by us in the following steps:
- Use a multimeter to measure the resistance. Connect the red lead to the positive terminal and the black lead to the negative terminal.
- Connect one lead to a cord and the other lead to another.
- start with the standard and set your test voltage.
- Take the reading and then change the cords.
- Once done with all pairs of cords, combine all of them and connect them to one lead and connect the second lead to the outer shield. This would give you the total resistance of the cord.
How to Use a Cen Tech Digital Multimeter
Cen-Tech is well-reputed and has been producing high-quality digital multimeters. A cen-Tech multimeter is an electronic instrument that would gauge voltage, demonstrating the power stored in the battery.
This diagnostic tool can also measure current in amps and resistance in ohms. These are used to check for car batteries for their current condition and health.
A Cen-Tech digital multimeter can measure AC/DC voltage, current, and resistance. Batteries are set in the engine or, on the off chance that you don’t discover it over there, at that point, counsel manual finds it.
A good battery of a vehicle regularly has 12.6 volts; however, it is prudent to check the resting voltage, which means checking the voltage toward the beginning of the day when the vehicle rests for the time being during the night.
Along these lines, you will get an accurate reading of the battery. After a lengthy drive, you will get a higher reading which can be deluding; that is why you should check for the resting voltage for exactness. You may see that your vehicle’s battery has gone bad until it is past the point of no return and it has fizzled. But then, there are clear signs that will reveal that your vehicle’s battery has turned down.
Even though vehicle batteries wear off after 3 to 5 years, they rely upon numerous different components. Vehicles utilized for short outings don’t let the battery charge wholly, and cars that are left for a more extended time face self-release of the battery.
The territory where you dwell will likewise influence the life of your battery, like in cooler areas; vehicle batteries last more while in more warm locales they last close to 3 years.
It is suggested that once your vehicle’s battery has matured for 3 years, you need to begin getting it tested yearly. These tests will help you in knowing the specific degree of disintegration of the battery.
Since the battery and alternator hold imperative significance in running the vehicle’s activities efficiently, you should keep them healthy.
If they turn bad, it will straightforwardly influence the electrical system, and on the off chance that it comes up short. At that point, you won’t have the option to control the motor henceforth the engine will not turn on.
Essential Steps for Using Cen-Tech Digital Multimeter
Using a Cen-Tech digital multimeter is not difficult at all, and the best part is that if you know how to use one of the multimeters, you would be able to use other models from Cen-Tech. The instructions for using each multimeter are the same.
A Cen-Tech digital multimeter can measure AC/DC voltage, current, resistance, testing, diodes, transistors, and batteries. These functions have specific settings on the digital multimeter, and each of these functions contains specific sensitivity settings.
So it is essential to choose a sensitivity setting when you select a function. Make sure not to select the sensitivity set too high or low because you would get an inaccurate reading or no reading at all.
What symbol means on Cen-Tech Multimeter
Following are the symbols on the cen tech multimeter;
The cen-Tech digital multimeter comes with a main selector wheel or dials, used to select the function. By rotating this dial, you will choose the function where;
- DCV means DC voltage
- ACV means AC voltage
- DCA refers to DC Current
- hFE is for the transistor setting
- Ω refers to ohms measuring resistance
- ACA refers to AC Current while the cross refers to the diode
- lastly, the horizontal signifies the battery test area.
You only need the following steps;
- While making the measurement, you need to rotate the dial to the function you intend to do and make sure to plug the leads correctly; black in the COM port and red in the VΩnA port
- Next, you have to note down the number shown on the LED screen while holding the wires.
- Make sure to connect the circuit to power while measuring current and voltage and vice versa for resistance and continuity.
- For current and resistance, you will need to plug the black lead in the COM port, and instead of plugging the red lead in the VΩnA port, you will now plug it in the 10 ADC port.
- For testing batteries, you will have an ACV area at the top, plug the black lead in the COM port and the red lead in the VΩnA port.
- Then you will contact the black lead’s tip to the battery’s negative terminal and the red lead’s tip to the positive terminal of the battery.
- It is advisable not to use this for 12-volt car batteries.
It is recommended that you wear safety glasses while using the digital multimeter and beware of the energized devices and never measure the resistance on an energized circuit.
How to Use Analog Multimeter to Measure Voltage
Multimeters are electronic instruments that technicians typically use for troubleshooting electrical appliances or wiring in general.
The newer digital multimeters widely replace analog multimeters, but there could be many instances where using the former would arise.
Even though analog multimeters are older, they are still preferred by some technicians and engineers. This is because they respond more quickly to any changes in the circuit and uninterruptedly take the reading, which allows them to monitor even the minutest changes.
It is quite easy to use an analog multimeter. All you need is some basic knowledge of voltage current and resistance measurement. Ensure to install a battery for measuring resistance because you will need a battery while measuring current and voltage. Following is a simple step to step guide demonstrating how to use an analog multimeter.
- First, you need to plug in the probes in the respective connections.
- Secondly, you will need to set the range and type of measurement. The maximum range must be above the estimated one since you can decrease it later if required, and a higher range would prevent damage.
- For getting precision in reading, you need to set the range optimally to get a maximum deflection.
With 2 wires and the correct settings, it will let you know whether you have a broken connection or any faulty parts. Since it is an inexpensive tool, it is owned by most repairers who are into wiring diagnostics.
With the help of a moving coil meter, an analog multimeter takes the test and uses the deflection of an indicator meter to show the measurement
How Many Ranges Are There in Analog Multimeter?
There are multiple ranges in an analog multimeter explained in full-scale deflection, which is the highest range. For optimal precision, you must get the scale reading between a quarter and full-scale deflection.
Typically an analog multimeter would have;
- DC Voltage ranging from 2.5V to 1000V
- AC Voltage ranging from 10V to 1000V
- DC Current running from 50µA, 1mA 10Mw, 100mA
- Resistance ranging from R to 10000R.
It would be best if you opted for the AC or DC voltage mode. Typically a dotted straight line is for DC, and a wavy line is for AC. Set the dial above the regular voltage to prevent any damages that could occur by choosing the one too low.
Please do not set it way too high because otherwise, the needle would hardly shift. For example, connecting the black probe to the negative terminal and the red probe to the positive terminal.
Using Analog Multimeter to Test Continuity
This test is done to check for the circuit if it is open or closed. For a circuit to function, it must be a closed one. For testing continuity, you will have to power off the device so that there is no shock.
Next, you will set the multimeter to Ohm mode, which would send a small charge to determine whether the circuit is closed or open. If you get an infinity reading, it indicates an open circuit, whereas a 0 reading will mean it is a closed circuit.
Using Analog Multimeter to Test Ohm/Resistance
This test is done to measure the amount of opposition a wire creates in a circuit. The unit for resistance is ohms. First, you need to disconnect the equipment from power so that both the multimeter and equipment are not damaged.
Turn On the analog multimeter, turn it to ohm mode, and plug In the black lead into the negative and the red lead into the positive. Now intuitively take the reading and check it against the resistor.
Final Thoughts
After reading the whole article, we hope you got all the needed answers for whom you have come here. It has given you all the basic information about the multimeter and its working and has guided you properly about using a multimeter.